Tuesday, May 28, 2013

Yummy Fruit Smoothie

Is it just me or has juicing become a thing lately? I feel like I see a new juice bar in LA at least once a week. I get it. We're in the era of fitness. People want the most convenient and coolest way to stay healthy.   And honestly, let's face it...sipping on your entire day's worth of fruits and veggies out of a cute plastic cup definitely beats awkwardly chomping on an apple during lunch.
But really, has anyone here ever used a juicer before? Do you have any idea how annoying it is to clean those monstrous machines? I think the average juicer's size and complexity is what turns people away from using it regularly. Bad for us, good for trendy new juicing shops.
My parents actually invested in one of those Jack LaLanne juicers about a decade ago. At first, it was awesome. We were juicing everything in sight. Weight was being lost, and health was rearing its head. But unfortunately, just like every other impulsive TV infomercial purchase, our juicer was retired after a few short months. This is sad though, because I really do like the idea of juicing and I wish we kept up with it.  So if anyone has a simpler solution to juicing which doesn't involve taking apart and cleaning a Rube Goldberg type apparatus, please let me know! In the mean time, I'll stick to smoothies.

Let's begin!

Ingredients: (Makes 2-3 servings)

  • 1 large banana
  • Fresh strawberries (I used about 10)
  • 1 cup frozen blueberries
  • 1 cup frozen pineapple
  • 1/4 cup milk 
  • 1/2 cup plain Greek yogurt
  • 1 Tablespoon honey
  • 3-5 ice cubes 

Directions:

Combine all of your ingredients (except ice cubes) in a blender

 Blend away!

After 2-3 minutes of blending, open lid and add ice cubes, then blend for one additional minute
Enjoy!!

Tip: Feel free to mix and match any fruits you like, or even add some greens for an extra health kick!

Measuring Cheat Sheet

I found this cute little measuring sheet on Pinterest!

I think it's super helpful to those who are new to cooking and baking, or just to anyone who needs a quick refresher.

Thursday, May 23, 2013

Grown-Up Mac n' Cheese

Comfort food: The food that cheers you up when you're feeling down, the food that brings back happy memories from your childhood, and the food that gives you a cozy feeling when you take the first bite. Growing up, my favorite food was always macaroni and cheese from a box.  I remember asking my mom to make it for me every day, and since I was such a picky eater as a kid, she was usually more than happy to do so. It was my favorite food to eat after school and it was the first thing I ever learned to make for myself--go me! Today, it still remains the comfort food I always turn to when I need that extra boost. But I've advanced a little and graduated from the boxed stuff to the real deal.

This recipe is fairly easy to make, and can be a quick go-to dinner during any night of the week. It might not be the healthiest thing out there, but it sure is delicious!

Let's begin!


Ingredients:
  • 8oz medium shell or bowtie pasta
  • 1 large crown of broccoli (or 2 cups of frozen)
  • 1/2 onion, chopped
  • 3 Tablespoons butter
  • 3 Tablespoons flour
  • 2.5 cups milk
  • 2 cups sharp cheddar cheese, shredded
  • 1/4 cup grated Parmesan cheese
  • Boneless, skinless chicken breast (optional)
  • 2 Tablespoons olive oil
  • salt and pepper, to taste

Tip: Instead of buying shredded cheese in a bag, I suggest using block cheese and grating it yourself. This saves you a few extra bucks and since you can freeze the leftover block, you don't have to go out and buy a new bag each time you need it.

Directions:

Chicken Breast
  •  Trim fat off chicken breast and season both sides with salt and pepper
  •  In a large skillet, heat olive oil for one minute
  • Over medium to low heat, add chicken breast to the skillet and let cook for 5 minutes
  • Flip chicken breast over and cook the other side for an additional 5 minutes
  • Allow to brown as desired and add more oil if the skillet begins to dry out
  •  Cut a small slit in the chicken breast to ensure inside has cooked
Pasta
  • In a large pot, bring water to a boil
  • In the mean time, chop and rinse broccoli
  • Add a few pinches of salt to the boiling water, then add pasta
  • Let pasta cook for 8-10 minutes, or until desired texture is reached
  • Add broccoli and let cook with pasta for 3-5 minutes
  •  Drain pasta and let it sit while you begin preparing the sauce 
Cheese Sauce

*Sorry for the lack of step-by-step pictures here...I was too excited to eat and forgot lol*
  • Melt butter in a small pot
  • Add onions and stir for 2-3 minutes (doing this for too long can cause the onions to sweeten)
  • At medium heat, add flour and stir continuously for 2 minutes making sure the flour doesn't burn
  • Slightly lower the heat and slowly begin to whisk in milk, 1/2 cup at a time. Be sure no clumps remain
  • Lower the heat and while stirring to get rid of clumps, allow the milk to slowly boil for 6-8 minutes or until the mixture becomes creamy
  • Add cheddar cheese and stir until melted
  • Add Parmesan cheese and stir until melted
  • Taste the sauce and add salt and pepper to desired taste
  • Pour sauce on top of pasta and mix
Tip: Make sure the pasta hasn't reached room temperature or the cheese will begin to clump. If this is the case, just add the sauce to the pasta over medium heat and stir until everything is blended together with a creamy consistency.

  • Add grilled chicken breast and sprinkle with Parmesan cheese.

Enjoy!!

Wednesday, May 22, 2013

Mexican-Style Shredded Chicken

Who here has ever used the excuse that they are too busy to cook? Raise your hands high because I know I have! It is just so much easier to drive home from work or school and microwave some frozen pizza, walk across the street to a fast food joint, or just settle for a bag of chips. I think I know something that will fix this problem.  

I'd have to say, one of the most essential things you can own is a slow cooker. If you're someone who hates cooking, I promise this will be your life saver. A slow cooker pretty much does all the work for you, while you're out carrying on with your busy day. It mixes flavors so well and cooks everything so perfectly, you can fool people into thinking you're a cooking mastermind. The possibilities with this little machine are endless! If you're moving out on your own or starting college, I highly suggest investing in one. And if you're on a tight budget, there are very affordable ones out there. This is the one I have and I'm in love with it (is that weird?).

Ok, enough with the slow cooker pitch. 
This recipe was originally inspired by Beth from BudgetBytes. This has to be, hands down, one of the easiest, most effortless, and DELICIOUS meals I've ever prepared. It's one of those throw and go, set it and forget it type of things. It's also pretty healthy, if you ask me. The prep time is under 10 minutes, so there is really no excuse with this one!

Let's begin!


Ingredients:
  • 2 boneless, skinless chicken breasts (1.5-2 lbs total)
  • 16oz jar of your favorite salsa
  • 15oz can whole black beans, drained
  • 8oz frozen corn
  • 1 Tablespoon minced garlic
  • 1 Tablespoon chili powder
  • 1/2 Tablespoon cumin
  • 1/2 teaspoon dried oregano
  • 1/2 teaspoon cayenne pepper
  • 1/4 teaspoon salt
  • 1/2 teaspoon black pepper
  • 1/4 cup water

Directions:


  • Trim the fat from the chicken breasts and place at the bottom of the slow cooker
  • Add the rest of the ingredients (add water last)
  • Mix everything together, close the lid, and cook on low for 8 hours or on high for 4 hours.
 
  • 8 hours later, take two forks and pull the chicken breasts apart.
  • Mix everything one last time and enjoy! 
Tip: Don't open the lid of the slow cooker in the middle of cooking. As tempting as this may be, it will interrupt the slow-cooking process.


Enjoy on a bed of rice and sprinkle your favorite cheese on top!


Or get creative and make some nachos!

Tip:  Freeze any remaining leftovers and reheat on the stovetop for tacos, burritos, quesadillas,or anything else you can think of!

Tuesday, May 21, 2013

Delicious Carrot Cake

There is a very funny story about me that very few people know. Growing up, I hated my birthday. I hated people coming over, I hated the attention, and most of all, I HATED CAKE! Every year until I was about 10 years old, I would hide in my room and cry when friends and family came over to celebrate my birthday. I can't exactly put my finger on where this craziness stemmed from, but I'm happy to report that those days are long behind me...sort of. The residuals left behind from those years still include my strong dislike for cake. I know, I know. But EVERYBODY loves cake! Right?..Right?
There's just something about birthday cake that makes my skin crawl. Although cakes are beautifully presented, it's what's on the inside that gets to me. The thought of extra airy and crumbly cake paired with a super whipped creamy topping is enough to make me lose my entire appetite.
But I promise I'm not a lost cause! I still love cupcakes with frosting and other sweet treats. 
And nothing quite beats my love for carrot cake. There is something about the taste of carrot cake and the texture of the delicious cream cheese frosting that makes it very very difficult for me to say no.

This recipe takes a little bit of time, preparation, and organization, but with some good old TLC, you can dive into a delicious slice that is sure to impress the crowd. Hey, who says you can't have your cake and eat it too?

Let's begin!

Before you start, here are some things you'll need:
  • Two 8-inch or 9-inch round cakepans (I bought mine at Target!)
  • Parchment paper (you can also use wax paper but I'd suggest sticking to parchment)
  • A pencil
  • Clean scissors 
Start by preheating your  oven to 350 degrees. Next, line your cakepans with parchment paper. I like to just place the rounds on a large square piece of parchment paper, outline it with a pencil, and cut it to place inside the pans. You can also lightly grease and sprinkle some flour in the cakepans and around the inner walls so that nothing sticks. Set your prepped pans aside for now.


Dry Mixture

In a large bowl, whisk together:
  • 2 cups flour 
  • 2 teaspoons baking soda
  • 1/2 teaspoon salt
  • 2 teaspoons ground cinnamon
Set dry mixture aside. 


Wet Mixture
  • 3 large eggs (cute faces optional)
  • 2 cups sugar (not pictured)
  • 3/4 cups vegetable oil
  • 3/4 cups buttermilk (not pictured)
  • 2 teaspoons vanilla extract
  • 2 cups grated carrots (about 2-3 large whole carrots)
  • 1 (8oz)can crushed pineapple (drained)
  • 4oz flaked, unsweetened coconut
  • 1 cup chopped pecans (save money by buying whole pecans and chopping yourself!)
Tip: I like to use dry buttermilk (I found this at Target as well but I've seen it at all the other grocery stores) since it doesn't spoil as quickly as the wet stuff.  If you do choose to use dry buttermilk, substitute the above amount with 3 tablespoons dry buttermilk plus 3/4 cup water. There's a handy conversion table on the container itself when you buy it.


  • Using your mixer, beat the eggs, sugar, vegetable oil, buttermilk, and vanilla at medium speed until you have a smooth consistency.
  • Next, add your dry mixture in, 1 cup at a time, and continue to beat at low speed until everything is blended.
  • Finally, using a spoon, fold in your grated carrots, chopped pecans, drained pineapple, and flaked coconuts.

  •  Pour your mixture in equal amounts into your previously prepped cake rounds. 
  • Bake for 25-30 minutes at 350 degrees. 
  • After about 25 minutes, insert a wooden toothpick in the cake. If the batter is still wet, bake for another 5 minutes. Keep doing this until the toothpick comes out clean.

Tip: I bake for about 15 minutes then rotate their positions in the oven and continue baking the remainder of the time.  


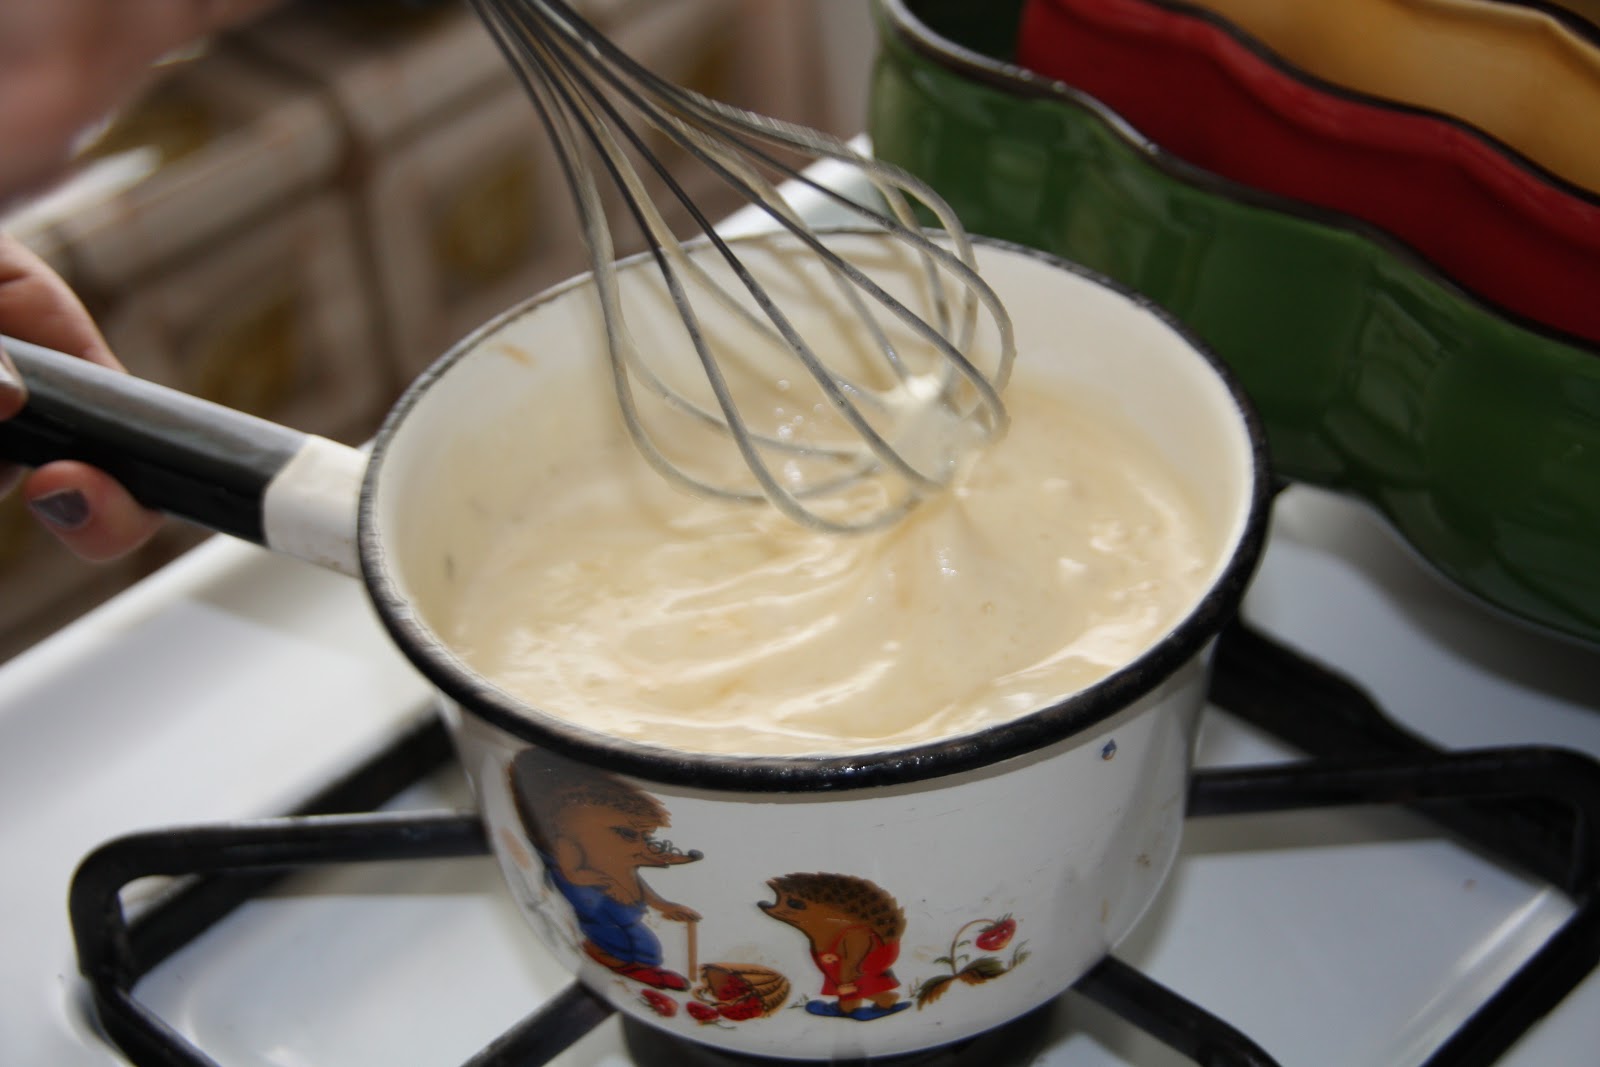
When your cakes are almost ready to come out, start preparing your Buttermilk Glaze. In a small pot, bring following ingredients to a boil over medium heat:
  •  1/4 cup butter (melt a little before adding the rest of the ingredients)
  • 1/2 cup sugar
  • 3/4 teaspoons baking soda
  • 1/4 cup buttermilk (or 1 Tablespoon dry buttermilk plus 3/4 cup water)
Stir often for 4 -5 minutes until mixture is smooth. Remove from heat and stir in 
  • 1/2 teaspoon vanilla extract

Tip: Don't overdo this step because your sugar will start to caramelize and eventually burn. Keep the pot off heat once everything is mixed in. It might change color, but don't worry. As long as the consistency remains smooth and fluid, it's all good.


When your cakes are ready, drizzle the buttermilk glaze evenly. 


Use a spoon to evenly spread and cover the tops.

Let them cool in the pans for 15-20 minutes.


After the cakes cool a little in the round pans, carefully flip them over onto cooling racks, remove parchment paper, and let them cool COMPLETELY. 
This can take more than an hour...

In the meantime, there are lots of dishes to be done and yummy cream cheese frosting to be made!


 Cream Cheese Frosting

You will need:
  • 3/4 cups butter, softened
  • 11oz cream cheese, softened
  • 2 cups sifted powdered sugar 
  • 1.5 teaspoons vanilla extract
Beat the butter and cream cheese together at medium speed until the mixture is creamy. Then add the powdered sugar and vanilla extract. Beat until smooth.

Tip: It is very VERY important to use powdered sugar and not regular sugar here. The powdered sugar will hold everything together and give the frosting that somewhat harder texture. If your cakes are still cooling, put your frosting in the fridge until you're ready to use it.


After your cakes have completely cooled on the cooling racks, you can begin frosting!
Line the presentation plate with some parchment paper and frost the first layer.


Then flip the second cake on top.


Continue to frost and smooth out the cake until you feel it's perfect. Remove the parchment paper and you're left with a clean presentation.


If you have any leftover frosting, add some food coloring and decorate any way you like!

Tip: Refrigerate the cake for a few hours (or overnight) before serving just so everything is held together nicely.


ENJOY!!!